In this article, I’m gonna be showing you how to read dobro tablature or any of my tabs for a 6-string lap-style type instrument (weissenborn, lap steel…).
Click here to access the following tabs informations:
General info
1. Tempo
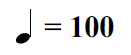
This is the tempo of the tune in beats per minute and you’ll see that on the first page of each of my tabs.
In this example, the tempo is 100 beats per minute.
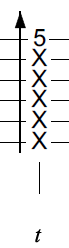
2. Strings
Each line represents a string. There are 6 lines and you read from the 6th string on the bottom line (which is also the bottom string) to the 1st string on the top line.
3. Tuning
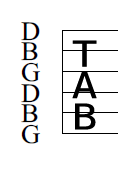
This indicates the tuning with the pitch of each open string next to the corresponding line. You should read this from the 6th string (on the bottom line) to the 1st string (on the top line). So here, GBDGBD from the thickest to the thinnest string.
4. Measure

Also called a bar, each measure is defined by a vertical line.
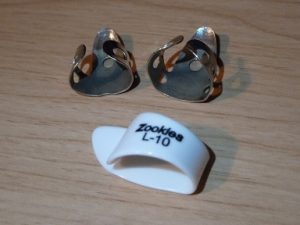
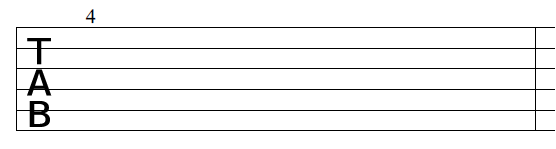
5. Measure numbers
The number on top of each first left measure indicates the measure number and is a visual landmark so that you know where you are in the song. In this example, on the left you read the 4th measure of the tab.
6. Time signature
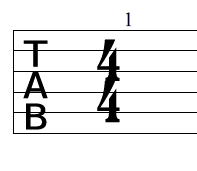
Usually appears in the first measure of the tab.
The top number indicates the number of beats and the bottom number the value of each beat. In this example, we are in 4/4 time.
The most common time signatures are:
4/4 : 4 beats within the bar with each beat being a quarter note (so 4 quarter notes within the bar, you count: 1, 2, 3, 4)
3/4: 3 beats within the bar with each beat being a quarter note (so 3 quarter notes within the bar, you count: 1, 2, 3)
6/8: 6 beats within the bar with each beat being a eighth note (so 6 eighth notes within the bar, you count 1, 2, 3, 1, 2, 3)
12/8: 12 beats within the bar with each beat being a eighth note (so 12 eighth notes within the bar, you count 1, 2, 3, 1, 2, 3, 1, 2, 3, 1, 2, 3)
7. Eighth note triplet feel
Sometimes, you see this eighth note triplet feel sign on top of the first measure:
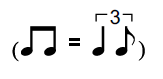
That means you count the eighth notes like you would count triplets: 1 and a, 2 and a, 3 and a, 4 and a, BUT… you omit the ‘and’ so it becomes: 1…a, 2…a, 3…a, 4…a, which makes those 8th notes swing!
If that’s still confusing, the best way to understand a eighth note triplet feel is to HEAR it so feel free to check out some of my songs arrangements where i play with a eighth note triplet feel: for example, this one for dobro, this one for weissenborn, or any of my western swing tunes.
8. Chord name
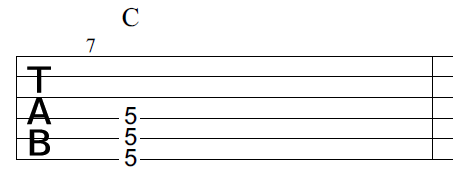
This letter on top of the bar above the stacked notes indicates the chord that is either played or implied.
Here the chord is a C major.
Navigations markers
You will sometimes see some of the following symbols in my tabs and they are used as navigation markers to prevent writing out extra measures and thus (hopefully) make the music easier to read.
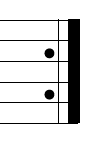
1. Repeat sign
repeat from the previous repeat sign facing the other way:
or if you don’t see that sign, repeat from the beginning of the tab.
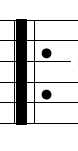
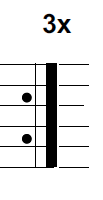
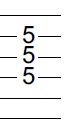
If the passage is to be repeated several times, then there is this sign on top of the measure which indicates how many times you repeat:
You repeat the passage 3 times in this example.
2. Alternate endings
Used in conjunction with the repeat sign, these numbered brackets indicate alternate endings. In this example, you would play the bracketed section with the “1.” on top of it the first time, then on the repeat you skip the “1.” section and jump to the “2.” section.
3. Segno
This symbol is used in conjunction with the D.S. sign and indicates a section that is to be repeated once you see the “D.S.” sign.
4. Dal Segno (D.S.)
means “Dal Segno” in italian and it instructs you to repeat everything starting from the segno symbol in your tab.
5. Da Capo (D.C.)
means “Da Capo” in italian and it instructs you to repeat everything from the beginning.
6. Coda
A coda is used to exit from a repeated section and leads to the ending of the tune most of the time (but not always).
This symbol is used in conjunction with the “Da Coda” instruction and can be used in conjunction with the “D.S. al Coda” or “D.C. al Coda” sign as well.
7. D.S. al Coda
This is a variant of the “D.S.” sign, you repeat everything from the segno symbol until you see the “Da Coda” instruction, then you jump to the “Coda” symbol.
8. D.C. al Coda
This is a variant of the “D.C.” sign, you repeat everything from the beginning until you see the “Da Coda” instruction, then you jump to the “Coda” symbol.
9. Da Coda
If there is a “D.S. al Coda” or “D.C. al Coda” sign in the tab then you will jump to the coda only after reaching the “D.S. al Coda” or “D.C. al Coda” sign first. if there is no “D.S. al Coda” or “D.C. al Coda” sign in the tab, then you jump to the coda whenever you reach the “Da Coda” sign on the second repeat.
10. Double coda
Same as the coda symbol but used when you need one more coda. You’ll then also have the signs “Da Double Coda”, “D.S. al Double Coda” etc.
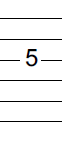
A number on a line represents the fretted note on the corresponding string (line).
Here you play the 5th fret 3rd string. Remember that with a steel guitar instrument, you should place your bar exactly above the fret.
If you play multiple notes at the same time, you would have them lined up vertically like this:
2. Vibrato
Put some vibrato on the note by moving your bar back and forth from left to right.
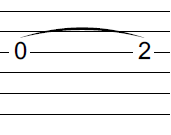
3. Hammer-on
You pick the first note and hammer-on to the second with your bar.
In this example, you hammer-on from 0 to 2 on the 3rd string.
A hammer-on always goes to a note which is higher in pitch.
For steel guitar instruments, you can only hammer-on from an open string.
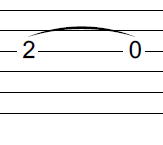
4. Puff-off
You pick the first note and pull-off to the second with your bar.
In this example, you pull-off from 2 to 0 on the 3rd string.
A pull-off always goes to a note which is lower in pitch.
For steel guitar instruments, you can only pull-off on to an open string.
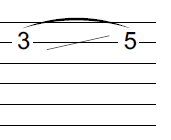
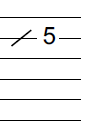
5. Slide up
Pick the first note and slide up to the second.
In this example, you slide up from 3 to 5 on the 2nd string.
You can do the same with multiple notes.
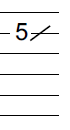
You can also slide up without targeting a note like this:
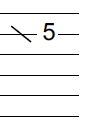
6. Slide down
Pick the first note and slide down to the second.
In this example, you slide down from 5 to 3.
You can do the same with multiple notes.
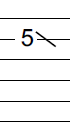
You can also slide down without targeting a note like this:
7. Slide from below
Same as a slide up but the note you’re sliding from is not explicit.
8. Slide from above
Same as a slide down but the note you’re sliding from is not explicit.
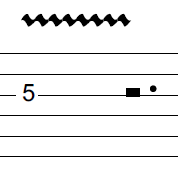
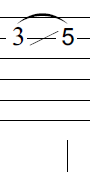
9. Quick slide
Very quick slide from one note to another on the beat. Here a quick slide from 3 to 5 on the 2nd string.
You can hear those quick slides on lots of my
songs arrangements.
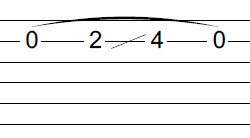
10. Combination of slides, hammer-ons, pull-offs
You can combine slides, hammer-ons and pull-offs.
For example:
Hammer-on from 0 to 2, slide up to 4, pull-off to 0. Only the first note is picked.
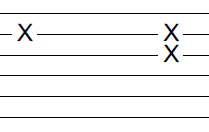
11. Mute
Here you mute the string with your left hand and pluck it with your right.
Can apply to multiple notes as you can see on the right.
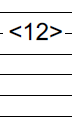
12. Harmonic
Touch lightly the 12th fret 2nd string with your left hand finger tip or side and then pick the note with your right hand while removing your left hand finger at the same time.
Right hand
1. Thumb (t), index (i) and middle (m) fingers
Pick the first note with your thumb (t), the second with your index (i), and the third with your middle (m).
Note: I’m using my thumb, index and middle only for my arrangements but you could use your ring and pinky as well.
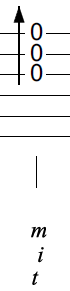
2. Pinch
Pinch the strings with the written right hand fingering.
The right hand finger symbols are stacked in the same order as the notes from the bottom to the top.
Here you pinch strings 3, 2, 1 with thumb, index and middle.
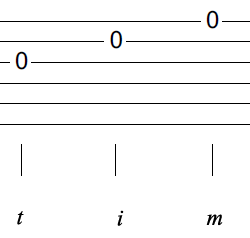
3. Roll
Roll the strings (ie. quickly pick one at a time) in the order of the written right hand fingering from the bottom to the top.
Here you roll strings 3, 2, 1 with thumb, index and middle.
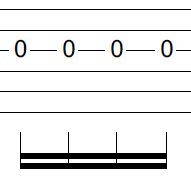
4. Strum
Strum the strings with your thumb, like you would with a regular guitar pick.
Here you strum all the open strings with your thumb.
Rake the strings with your thumb.
In this example, you would tilt your bar up on the 5th fret 1st string and mute all the other strings with your ring and pinky, then rake all the strings.
Rhythm
Here are the basics of rhythm notation in 4/4. Once you get those, you can apply it to other time signatures.
1. Whole note
Hold the note for 4 beats (in 4/4 time). There is no rhythmic symbol under the note as opposed to all the other note length symbols (half note, quarter note…)
2. Half note
The vertical line means you hold the note for 2 beats (in 4/4 time).
it is half the duration of a whole note (so two half notes = one whole note)
3. Quarter note
This vertical line is longer than the half note vertical line and means you hold the note for 1 beat (in 4/4 time).
It is half the duration of a half note (so two quarter notes = one half note and four quarter notes = one whole note).
In 4/4 time, you count each quarter note “1 2 3 4”.
4. Eighth note
This is a eighth note and is half the value of a quarter note (so two eighth notes = one quarter note)
If you have two eighth notes, you join them with a horizontal line like this:
In 4/4 time, you count each eighth note “1 and 2 and 3 and 4 and”.
5. Sixteenth note
This is a sixteenth note and is half the value of a eighth note (so two sixteenth notes = one eighth note and four sixteenth notes = one quarter note)
If you have two or more sixteenth notes, you join them with a double horizontal line like this:
In 4/4 time, you count each sixteenth note “1 e & a 2 e & a 3 e & a 4 e & a”.
6. Triplets
These are eighth note triplets ie. 3 eighth notes in the space of one beat.
You count those “1 2 3” (or “trip-a-let”).
You can also have quarter note triplets, sixteenth note triplets…
7. Dotted half note
The point next to the vertical line means you increase the duration of the half note by half of its original value.
So in this example, you hold the note for 3 beats in 4/4 time.
8. Dotted quarter note
Longer vertical line (quarter note) with a dot next to it.
Increases the duration of the quarter note by half of its original value.
So in this example, you hold the note for 1 beat and a half in 4/4 time.
9. Dotted eighth note
Increases the duration of the eighth note by half of its original value.
So you hold the note for the length of an eighth note plus a sixteenth note.
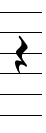
10. Whole rest
You don’t play anything (rest) for the length of a whole note.
11. Half rest
You don’t play anything (rest) for the length of a half note.
12. Quarter rest
You don’t play anything (rest) for the length of a quarter note.
13. Eighth rest
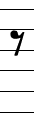
You don’t play anything (rest) for the length of a eighth note.
14. Sixteenth rest
You don’t play anything (rest) for the length of a sixteenth note.
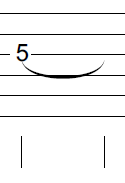
15. Tie
A tie connects two notes of the same pitch but you only play the first one and hold it for the duration of both notes.
Here you play the 5th fret 3rd string and hold the note for 2 beats (two quarter notes).
So you want to learn a new tuning and you don’t know where to start because all the dots seem to be in the wrong place 🙁
We have all been there.
Learning a new tuning or multiples tunings can quickly become confusing and overwhelming because all of a sudden your visual landmarks don’t make sense anymore.
So how to make something unfamiliar become familiar?
Well, the key is to use what you have learnt from previous tunings and apply as much as you can to the new tuning.
By finding similarities and connections between the new tuning you’re learning and previous tunings you’ve learnt, you’ll be able to quickly build a visual fretboard map for the new tuning.
To do so, the most important thing to learn is the new tuning interval layout, that is the intervals between the open strings in relation to a tonal center.
For example, in a dobro GBDGBD tuning, G, B and D are respectively the root, third and fifth of a G major chord so the interval layout of this tuning is 1, 3, 5, 1, 3, 5 (root, third, fifth, root, third, fifth).
Learning this will help you:
- Learning chords,
- Applying shapes, licks and patterns you already know,
- Learning note names
Of course, intervals are not the first thing beginners learn but i don’t think you should try and learn a new tuning if you’re a beginner anyway so if you decide to learn a new tuning, i assume you’re probably an intermediate player who already has a good grasp of a previous tuning and who knows what intervals are 🙂
So let’s discuss the first benefit of learning the tuning interval layout.
1. Learning chords
Learning chords is a powerful thing because it will help you build a fretboard map quickly.
The other benefit from learning chords is that you can learn both your chords and note names at the same time.
Let’s take an example.
You want to learn how to play in open D tuning: D A D F# A D.
If you know D, F# and A respectively the root, third and fifth of a D major chord, you can deduce that the interval layout of open D is:
1, 5, 1, 3, 5, 1 (root, fifth, root, third, fifth, root).
So when you strum the open strings, you get a D major chord.
From there you can quickly learn your straight bar major chords all over the fretboard.
For example, on the 5th fret of the 6th string, you’ve got a G note so you get a G major chord when strumming the strings on the 5th fret.
Now let’s try to use this knowledge of the tuning interval layout to apply chord shapes, licks and patterns you already know.
2. Applying chord shapes, licks and patterns
The key here is to compare your new tuning to a tuning you already know.
Let’s say you come from a dobro background and play in a GBDGBD tuning.
As we’ve seen above, the interval layout of this tuning is 1, 3, 5, 1, 3, 5 (root, third, fifth, root, third, fifth).
Compare that to open D and you’ve got the following chart:
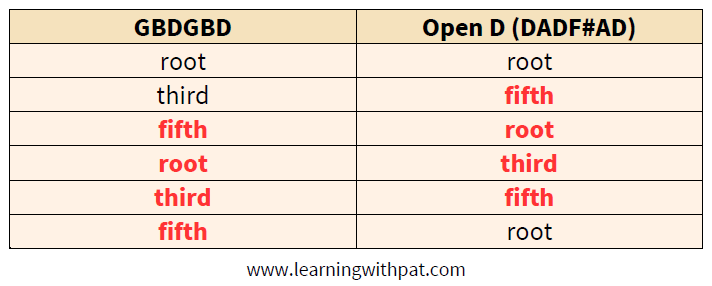
Notice how we’ve got the same fifth, root, third, fifth pattern in both tunings: on strings 4, 3, 2, 1 in GBDGBD tuning and on strings 5, 4, 3, 2 in open D.
That means you can apply your GBDGBD shapes, patterns and licks from strings 4, 3, 2, 1 by moving them down one string to strings 5, 4, 3, 2 in open D!
You could also visualize open D tuning as a GBDGBD tuning without the lower third (the 5th string) plus a root on the 1st string.
3. Learning the note names
Learning the note names is crucial to learn scales, chords, start to improvise etc.
But it can be a daunting dask and once again we can use the power of intervals layouts and connections between different tunings to learn quicker.
If you’re lucky, you’ll already know all the note names.
For example, if you know your standard guitar tuning EADGBE and try to learn dobro in GBDGBD tuning, it will just be a matter of learning a new tuning layout with note names on strings you already know (G, B and D)
If you’re less lucky, like in the case of knowing GBDGBD and then learning DADF#AD, you’ll have to learn the note names of strings you’ve never learnt before (A and F# in this case).
But again, we can find shortcuts.
An obvious one in the case of learning the note names on the F# string would be to see it as being one semitone below G, then all you would have to is to mentally transpose the note names of a G string one semitone below…
But that could be confusing so let’s try to use your knowledge of the tuning interval layout assuming:
– you know your chords
– you know the note names of each chord
With your knowledge of the tuning interval layout, you can quickly deduce the note names of your F# string.
Since F# is the third of a D major chord , each note on this string will be the major third of the chord with its root on the 6th, 4th or 1st string (remember the 1, 5, 1, 3, 5, 1 layout).
For example:
– 5th fret is the major third of G major
– The major third of G major is B
So 5th fret of the F# string is B.
Let’s sum this up with a chart:

Also note that when you learn the notes on the A string, you only need to learn it once because once you know the note names on your 5th string, you’ll also know them on the 2nd string (since both 5th and 2nd open strings are an A).
So as you can see, it’s all about finding short paths to learn quicker and to apply what you’ve learnt from a previous instrument is a great way to do that.
And not only can you apply your theory knowledge to the new instrument but you can apply previous techniques you’ve learnt as well!
This can work both ways too: try to apply what you’ve learnt from your new instrument to other instruments you already know how to play.
Anyways, don’t forget: learning a new tuning takes time, lots of time (and work too of course)!!
So give yourself time, don’t make your head explode 🙂 and get used to how the new tuning sounds like, find out what you like about it and how you can make nice music with it, it’s all about exploring and having fun! 🙂

Although there are differences (mostly in the technique but also in the sound) between the acoustic guitar and the squareneck resonator guitar, i found the approach to be pretty much the same when i’m arranging a song to be played as a solo piece for either of these instruments.
Regardless of the instrument, the basic principle to fingerstyle guitar or “fingerpicking style technique” applied to the dobro is that you play the melody and the accompaniment at the same time.
If you want to know more about this technique, then first check out some of my tutorials here where i’ve arranged several songs for the dobro.
Now i’m going to show you the few steps that i use and that will hopefully help you learn how to arrange a song for dobro.
Step 1 : Decide on the song and key
The first step is of course to decide which song you are going to arrange. If you’re just starting out, i would highly recommend that you pick a song with a simple melody and chord progression.
Now do a “quick” transcription of the potential song.
First figure out the melody.
Try to play it on different parts of the neck. Can you use open strings for some of those notes? Are there licks that you could play more easily on certain parts of the neck?
Then experiment in a few different keys.
Are some of the previous phrases easier to play in that key? Can you find alternative positions? Does the whole feel of the melody sound different? Better to your ear?
Now figure out the chords.
Then do a “quick” arrangement ie. play the melody while adding only the bass note of the chord on the first beat of each mesure (or any chord tone – for example root, third or fifth for a major chord – but play only one note for now!).
Again try this in different keys. Can you work out easier positions in certain keys when you add the bass notes? Does it sound better to you?
Now make a choice: is this arrangement workable? Will it sound good?
At this point, it would be absolutely legit to consider that a song will not work that well as a solo piece on your instrument (for example, due to its limitations, some chords can’t be easily played on the dobro – which is not necessarily a bad thing either 😉 ).
If there are limitations or obstacles, can’t you take advantage of that and find a way to make your arrangement unique and outstanding?
Step 2 : the melody
Ok, so after (maybe) a few tries, you’ve picked a song. You’ve picked a key.
Bonus: you’ve already started the arrangement work before by quickly figuring out the melody and chords 🙂
Now work carefully on the melody.
Spend time on it. Try to make it sound as good as possible. Use the open strings. Use accents. Use embellishments (hammer-ons, pull-offs, vibrato, sliding…). Work on your tone.
I like to stay true to the original melody most of the time but you could change it too: change some of the notes (make sure it’s still recognizable!), change the rhythm.
Either way, once you know how you want it to sound, go for it but really polish it and make it shine!
Step 3: the bass part
Once you feel happy with the melody, it’s time to add the bass part.
In step 1, you’ve worked out a “quick” arrangement part where you’ve played only the bass note of the chord on the first beat of each mesure.
Now add in some other chord tones and work out a simple but nice steady rhythm.
A good starting point is to alternate between either the 6th and 4th strings or the 6th and 5th strings (or make a combination of both). Sometimes you’ll also want to play only one bass note and let it ring for a whole measure. Be creative!
Step 4: putting it all together
Now put the melody and bass part together. Try to make them fit together and blend as best as possible.
At this point, you’ll probably have to make some adjustments to either the melody or the bass part.
What i recommend is to stick to the melody you’ve decided upon before and change it as little as possible (unless you think it sounds better by changing it!).
Instead, try to adjust the bass part whenever possible.
This said, what you’ll most certainly have to change anyway is either the fingering or positions (or both) because some of the melody notes won’t be played with the same fingers (or in the same position) once you add the bass notes (or vice versa).
Either way, don’t make drastic changes to the melody you’ve worked on in step 2 and try to retain its original feel (or intention)!
Step 5: “filling” it
There is one very last step to your almost-finished arrangement.
Depending on the song, you might want to keep your arrangement simple and stick to a simple rhythm and melody.
But oftentimes, you’d want to fancy it up a bit to make it more interesting and unique.
So what you will do is “fill” your arrangement by playing some more notes of a chord here and there when there is some space (especially when you’ve got a melody note resting for a few beats). This will tighten the overall rhythm and feel of the piece.
Step 6: writing it down and practice!
Once you feel happy with what you’ve got, write down your transcription!
You can either break it down into chunks and arrange for example a whole verse then write it down, then arrange a chorus and write it down etc..or you can do it all at once.
I usually prefer the former but that is up to you.
Either way I like to write down the notes, rhythm, chord names and fingering so that i remember exactly how i played it in the first place (check out some of my arrangements here).
This is an important step, you wouldn’t want to forget an awesome arrangement that you’ve written and start it all over again the next day, do you? 😉
Now that your transcription is written down, decide at which tempo you will play it.
Then it’s time to put some practice in! Don’t neglect this final step because that’s how listeners will judge your work!
Good luck!
Knowing WHAT to practice is the first step that we have discussed in this article.
But this alone is not enough. You absolutely need to learn HOW to practice.
If you followed the guidelines I have talked about here, you have set up your main goal and short-term goals.
Now you need some kind of organization to make it happen. You can’t tackle everything at once. It just won’t work.
WHAT YOU NEED IS A PRACTICE ROUTINE.
A practice routine is basically a list of things you will work on repeatedly for the next while.
But the first thing you have to consider before even writing down your practice routine is how much time you can devote to practice each day.
In my opinion, you should practice each day for at least 5 days a week.
30 minutes to 1 hour a day is a fantastic amount of time that will lead to great progress if you stick to it. But even 10 minutes each day will lead to better results than say, 1 hour twice a week.
Why is this so? because the key is to be consistent. Be consistent.
We need repetition to put things in our heads (and muscles) and make things happen. That’s just the way it works.
All the great famous guitar or dobro players were just like you and me when they started out: they could not play anything but they spent hours and hours practicing again and again in their room alone until they reached the level they have now.
So let’s get back to our practice routine.
Ideally, a practice routine should include several subjects of study: theory, technique, transcribing / repertoire, creativity (improvisation, writing licks, having some fun!!).
Of course, there will be times when you need to focus on a specific subject (transcribing for example) but you should at least try to incorporate in your practice routine 2 or 3 of the areas of study mentionned above.
Let’s take again the example of learning blues rhythm on the dobro and let’s say that you can devote 1 hour each day to your practice. Your first practice routine could look like:
- Understand the 12-bar blues structure and write down the chords chart in 3 different keys (10 min)
- Play the 12-bar blues in the 3 chosen keys (5 min each, 15 min total)
- Practice rhythm patterns A & B (5 min each, 10 min total)
- Pick one of your favorite blues tunes and find out the key then jam along the track by applying the previous concepts learnt to that tune (25 min)
Now, a practice routine is not set in stone. It will (and must) change and evolve as you progress.
That’s why you should also put a date on your goals because it gives you a greater motivation and a sense of accomplishment when you finish them. But remember, this is a schedule not a deadline so you could either finish them sooner or later than planned, it doesn’t matter as long as you know where you’re going!
I should also add that an immediate benefit of a scheduled practice routine is that you will know WHAT to practice in advance, which will prevent you from mindless noodling 😉
When you feel like you’ve accomplished the tasks of your practice routine then it’s time to change it and add new challenging stuff to it. This new practice routine should reflect your evolution thus include harder stuff than the previous things you have worked on so far!
I hope this article helped you learn HOW to practice dobro or weissenborn or any instrument.
Once your routine is set up and you’re good to go, you might want to read this
article where i share a few tips to help you get the most out of your practice time.
Wishing you the best of luck!

WHAT to practice on dobro or weissenborn (or any instrument)?
If you were to ask me this question, my answer would be: ‘i don’t know!’.
To answer this question, you need to ask yourself first: what do i want to achieve with my instrument?
If you want to achieve something, you need to have a GOAL. whatever the goal is. You need to know where you want to go. this is the key.
if you don’t know where you’re going, you’ll probably end up going…nowhere.
Some goal examples could be: to learn how to play bluegrass rhythm, to learn a few bluegrass songs, to have a repertoire to play at parties, to be a session musician etc.
Find something that excites you. Then really go for it. This is how you will keep yourself inspired and motivated!
Of course, the bigger the goal, the larger the number of things you’ll have to practice to get there…but remember, the journey is the fun part, not the destination!
So once you set up your main goal (which we will call long-term goal), you will have to write down smaller, manageable short-term goals that will help you get where you want to go (to your main long-term goal).
Let’s say you want to learn how to play blues rhythm on the dobro. A few of your short-term goals would probably include: learning different rhythm patterns, learning classic turnarounds, transcribing classic tunes etc.
Now, if you find out what your goal is but are not sure about what your short-term goals should be, then it might be time to seek for a (good) teacher that will help you get there. You could also do it all by yourself with trial and error, which has its own benefits too but definitely takes more time.
There are a few general guidelines though that will be useful when setting up your main goal and short-term goals:
- write down your goals: grab a piece of paper and write down all your ideas so that you can reflect on them later on and develop a clearer picture of where you want to go.
- be realistic: to become the greatest dobro player in the world is a cool goal but it sounds a bit vague. try to be more specific, consider how much time you can devote to practice or you’ll probably end up losing motivation at some point.
- figure out how to get there: look for tutorials, books, online teachers, 1-on-1 lessons…all the steps required to achieve your short-term goals (and main goal in the long run!).
Once you know WHAT to practice, you need to know HOW to practice.
This a crucial step too which I talk about in this next article.
But before that, take a pencil, paper and try to figure out what your goals are.
Good luck!